Webcams — Add, View, and Manage
Welcome to your friendly guide for creating and managing webcams on the WebcamPark platform! 🎉
Whether you’re a first-time user or looking to expand your webcam network, this guide will walk you through everything you need to know. We’ve made it as simple and straightforward as possible, so you can get your webcams up and running in no time!
Getting started
Section titled “Getting started”What You’ll Need
Section titled “What You’ll Need”- Access to the WebcamPark admin panel
- Your login credentials
- Details about your webcam (serial number, or login info and access to your webcam over the network)
Accessing the Admin Panel
Section titled “Accessing the Admin Panel”First things first - let’s get you logged into the system!
-
Navigate to the Login Page
Open your web browser and go to your WebcamPark admin panel URL. You’ll see a clean, friendly login screen like this:

-
Enter Your Credentials
- Enter your email address in the “Email” field
- Type your password in the “Password” field
- Click the “Sign in” button
💡 Pro Tip: Make sure to use the correct email format and double-check your password for any typos!
-
Welcome to Your Dashboard!
Once you’re logged in, you’ll land on your beautiful dashboard:
This is your command center! From here, you can access all the tools you need to manage your webcams effectively.
Manage your webcams
Section titled “Manage your webcams”Accessing the Webcam Management Area
Section titled “Accessing the Webcam Management Area”Now that you’re in the dashboard, let’s navigate to where the magic happens - your webcam management area! You can reach the area by navigating to app.webcampark.com/webcams or following these steps:
-
Find the Webcams Section Look at the left sidebar menu. You will see several options including “Dashboard,” “Webcams,” “Streams,” and more.
-
Click on “Webcams” Simply click on the “Webcams” option in the sidebar menu.
-
View Your Webcam List
You’ll now see your webcam management interface:
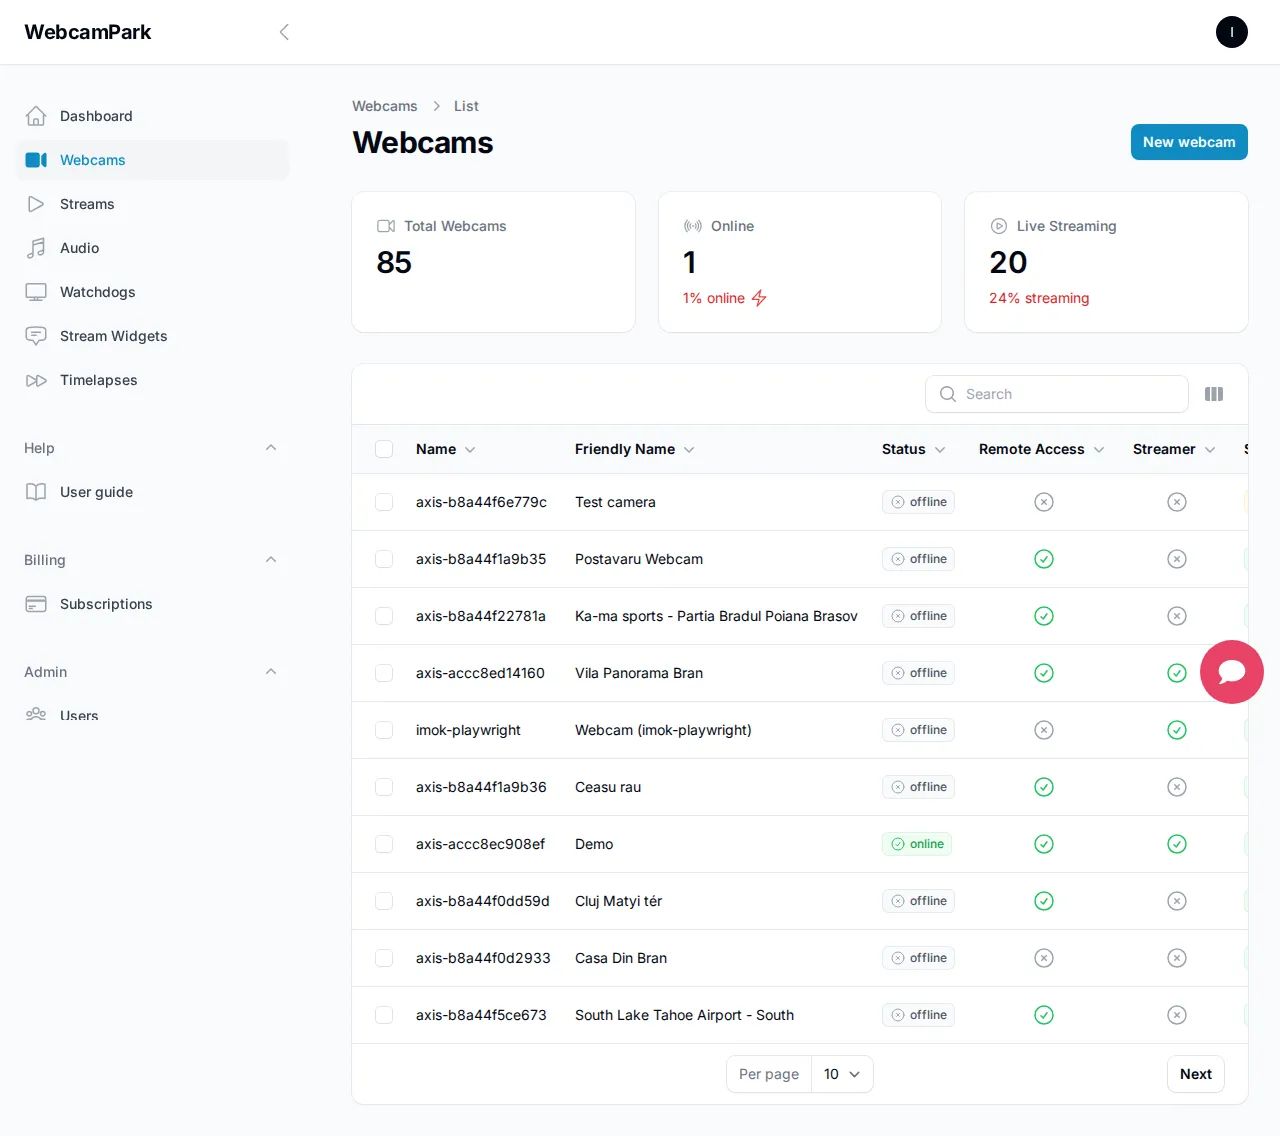
This screen shows you all your existing webcams (if any) and gives you options to manage them. Don’t worry if it’s empty at first - we’re about to add your first webcam! 🎯
Adding Your First Webcam
Section titled “Adding Your First Webcam”Ready to add a new webcam to your account? Let’s do this step by step!
Step-by-Step Webcam Creation
Section titled “Step-by-Step Webcam Creation”-
Start the Process Adding the Webcam
From your webcam management page, look for and click the “Create” or “New” button. This should be on the top right part of the page. This will take you to the webcam registration wizard. This is a wizard containing multiple steps, but don’t worry, you hardly will need to do anything.
-
Setup your webcam
The first step of the wizard provides general suggestions for setting up your webcam.
Tip: Refer to your camera’s user manual or setup guide for instructions tailored to your model.

Before you begin wiring, make sure you have all of the following:
- 📷 IP Webcam (the camera itself)
- 🔌 PoE Injector (to provide both power and data to the camera)
- 🌐 Two Ethernet (FTP) Cables with RJ45 connectors
- 📶 Router or Switch with at least one free LAN port
💡 Note: Some IP webcams support PoE directly. If your router/switch also supports PoE, you may not need a PoE injector at all. Check your device’s specifications.
Follow these steps to connect your webcam properly:
- Connect Camera to PoE Injector (Camera Port)
- Take the first Ethernet cable.
- Plug one end into the IP webcam’s LAN port.
- Plug the other end into the PoE injector’s “PoE” port (sometimes labeled Camera).
- Connect PoE Injector to Router
- Take the second Ethernet cable.
- Plug one end into the PoE injector’s “LAN/Data” port.
- Plug the other end into a free LAN port on your router.
- Power Up the PoE Injector
- Plug the PoE injector’s power adapter into a wall outlet.
Once powered, the camera should automatically turn on and receive both power and network connectivity through the first cable. You should then be able to access the webcam’s web UI through your browser.
When you’re done with these steps, click Next.
-
Get Your Webcam Ready to Work with WebcamPark
Now it’s time to connect your webcam to WebcamPark so it can start streaming.
- First, find out the exact model name of your AXIS Webcam.
- You can usually spot it on a sticker on the camera itself.
- Or, if you log into your webcam’s settings page (called the “web admin interface”), you’ll see the model name in the “About” section.
- Once you know the model, just pick it from the dropdown menu in the wizard.
- After that, you’ll see some “apps” appear on the page. These are small add-ons that help your camera talk to WebcamPark.
- Download and install the apps it suggests onto your camera. Don’t worry—this is usually just a couple of clicks.
When you’re finished, hit Next.
-
Link Your Webcam to Your Account
Great job! Now let’s officially connect your camera to your WebcamPark account. There are two easy ways to do it:
-
Using a QR Code (super quick!)
- Go back into your webcam’s settings page.
- Open the WebcamPark app settings.
- You’ll see a QR code and a link. Just follow the instructions, and your webcam will be linked to your account.
-
Using the Webcam Name
- In the WebcamPark app settings, you’ll also see a card with your camera’s name.
- Simply type that name into the wizard, and you’re all set.
Once you’ve done this, click Next.
-
-
You’re all set!
That’s it—you did it! On the final page of the wizard, you’ll see handy shortcuts to view your new webcam or create a live stream for it.
Manage existing webcams
Section titled “Manage existing webcams”What You Can Do With Your Webcams
Section titled “What You Can Do With Your Webcams”Once your webcams are set up, you have several management options:
Monitor status
- Check if your webcams are online and streaming properly
- View connection status and any error messages
- Monitor streaming quality and performance
Edit settings
- Update webcam details like name and description
- Modify technical settings if needed
- Change streaming parameters
Troubleshoot issues
- Access diagnostic tools
- View connection logs
- Test connectivity
Remove webcams
- Safely delete webcams you no longer need
- Clean up your webcam list
Quick Actions You Can Perform
Section titled “Quick Actions You Can Perform”From the webcam management list, you can:
- View live feed: Click on any webcam to see its current stream
- Edit settings: Use the edit button to modify the webcam configuration
- Check statistics: View streaming statistics and uptime data
- Restart connection: Force reconnect if a camera goes offline
Overview
Section titled “Overview”In the webcam management area, you can see all your webcams. You can customize this view by enabling the columns you are interested in:
- webcam name (used to associate to your account)
- webcam serial number
- model name
- Axis OS version
- IP address
- Remote access type
- owner
- subscription
- first connected
- last updated
Using these columns, you can sort and quickly identify which webcams would benefit from a firmware or app update, or identify settings which need to be updated.
Click the More button at the far right of a webcam to see the available actions for that webcam. These are shortcuts to actions you can perform for this webcam.
Click the webcam to open its edit page, where you can adjust the settings.
Changing the webcam settings.
Section titled “Changing the webcam settings.”In the edit view, the settings are grouped into tabs:
- Webcam
- Webcam name: the is
axis-term followed by the (lowercase) serial number. read only - Webcam friendly name: You can name your webcams. We suggest a short and meaningful name. This name does not affect stream overlays; it only helps you identify your webcams more easily.
- Model name: The model of your webcam. read only
- Serial number: your webcam’s serial number.
- Firmware version: the Axis OS version installed on your webcam. read only
- App version: the installed streaming application version. read only
- Managers: The list of users who can manage your webcam. Useful for teams.
- Webcam name: the is
- Stream
- Resolution: the resolution at which your webcam streams. The maximum resolution allowed is defined by your webcam’s capability and your subscription.
- Stream compression: the level of compression used when encoding your streams. The higher the compresion, lowwer the quality. Higher compression helps when you have low bandwith for streaming. Higher quality lowers network bandwith usage.
- Zip stream: the amaount of zipstream used while sending your stream to the streaming platform.
- Overlay
These settings configure the overlay on your streams. The overlay consists of 5 sections. The top bar is devided into 4 sections. The first one is the
overlay title, followed by current date time, followed byoverlay description, followed bysponsor name(s). On the top right corner your sponsor logos will be shown. - Audio You can select audio channels to be playd on your stream. In the basic plan you can choos from 3 different options. If you want to use your own audio you will need to upgrade your subscription for that webcam.
🔧 Common Troubleshooting Tips
Section titled “🔧 Common Troubleshooting Tips”Don’t worry if you encounter issues - here are solutions to the most common problems:
🚫 Camera Won’t Connect
Section titled “🚫 Camera Won’t Connect”Problem: Your camera shows as offline or won’t connect.
Solutions to Try:
-
Check Network Connection
- Verify your camera is powered on and connected to the network
- Test if you can ping the camera’s IP address
-
Check Firewall Settings
- Make sure the camera’s ports aren’t blocked
- Verify network security settings
📺 Poor Video Quality
Section titled “📺 Poor Video Quality”Problem: The video stream is choppy, blurry, or has poor quality.
Solutions to Try:
-
Adjust Resolution Settings
- Try increase your cmpression for the stream.
- Try lowering the resolution temporarily
-
Check Network Bandwidth
- Ensure sufficient internet speed for streaming
- Consider limiting the number of simultaneous streams
-
Camera Position
- Check if the camera lens is clean
- Verify proper lighting conditions
🔄 Frequent Disconnections
Section titled “🔄 Frequent Disconnections”Problem: Camera keeps going offline randomly.
Solutions to Try:
-
Network Stability
- Test network connection stability
- Check for interference with wireless cameras
-
Power Supply Issues
- Check if the camera has stable power
- Consider using a UPS for critical cameras
💡 Pro Tips for Success
Section titled “💡 Pro Tips for Success”🎯 Best Practices
Section titled “🎯 Best Practices”- Organize Your Cameras: Use clear, descriptive names for easy identification
- Regular Maintenance: Check your cameras weekly to ensure they’re working properly
- Monitor Performance: Keep an eye on streaming quality and connection stability
🔒 Security Recommendations
Section titled “🔒 Security Recommendations”- Strong Passwords: Always use strong, unique passwords for your cameras
- Regular Updates: Keep your camera firmware up to date
- Network Security: Secure your network to protect your camera feeds
- Access Control: Only share access with trusted individuals
🎉 You’re All Set
Section titled “🎉 You’re All Set”Congratulations! You now have all the knowledge you need to create and manage webcams on the WebcamPark platform.
Remember:
- Take your time when setting up new cameras
- Don’t hesitate to experiment with different settings
- Regular monitoring helps catch issues early
- The community is here to help if you need support
🆘 Need More Help?
Section titled “🆘 Need More Help?”If you run into any issues or have questions that aren’t covered in this guide:
- Check the platform’s help section for additional resources
- Reach out to the support team through the chat feature
- Connect with other users in the community forums
Happy streaming! 📹✨
This guide was created to help you make the most of your WebcamPark experience. We’re constantly improving our platform, so some interface elements might look slightly different as we add new features. The core functionality remains the same!